Loading page header ... or Your browser does not support JavaScript
Collection of various ideasThere are a few pages, so an index will be in order:
The first idea I want to present here is a cheap variation of a traditional clamp. This type of clamp is often referred to as "Wooden cramp" When we decide to build our own boat we may be lucky and have a few commercially made clamps that came to us one way or another.They often are metal G-clamps; if we are lucky we have a few patent clamps that quickly slide up to the work piece, unlike the G-clamp where you have to turn the spindle all the way to adjust it. These clamps will be useful and you do need a few of them, but soon it becomes apparent that we just do not have nearly enough for the job. This is especially true when we come to laminate the gunwale. At a spacing of about 125mm or 5", which is a good one to use, you need an 'oodleplex' of clamps. There is no way you can justify the expense of say 50 clamps, but a few lengths of planed fir or pine batten and some threaded bar and a box of matching nuts and washers will probably be in the budget. |
||||||
|
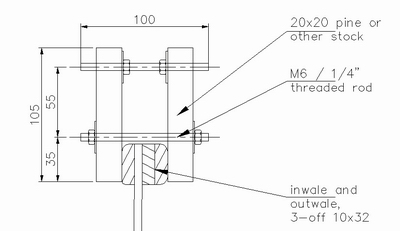
The principle of wooden cramps is a very simple one. The sketch at left is worth a thousand words. The cramp consists of two pieces of timber, a spacer at one end, a bolt to provide the closing force near the work piece. I have made cramps with actual timber spacers at the far end, but they have the disadvantage of needing different widths of spacers for different workpiece thicknesses and so the final version now uses a piece of threaded bar with two nuts on the inside so one can adjust for the workpiece thickness. |
|||||
|
Although I show a threaded bar for both, the clamping force can be applied by a bolt. Some of my cramps have 'cup-square' bolts, that is they have a square section below the head and that will stop the bolt rotating when you tighten the nut. Nice, but not absolutely necessary. Dimensions are metric, i.e. in 'mm' and should be seen as a guide. You can vary any or all sizes shown to suit your project and materials available. However, it is worth noting that as small as they seem they are amply strong enough for the laminating of gunwales of the dimensions shown (10x32 is 3/8" x 1 1/4"). I used them again recently on a 15 footer with 10x40 (3/8" x 1 1/2") gunwale lamination and they coped just fine. Conversion of metric measurements shown:
|
||||||
|
"Weights" In a lot of cases where gluing pressure needs to be applied it is possible to do so with weights. You cast around in your garage/workshop for something that is heavy and clean and sits nicely flat and there is generally not a lot that answers the specification. So before you start your project, here is what you do: Visit your local motorbike shop - but avoid buying a big bike! This may not be easy if, like me, you love big bikes. |
||||||
|
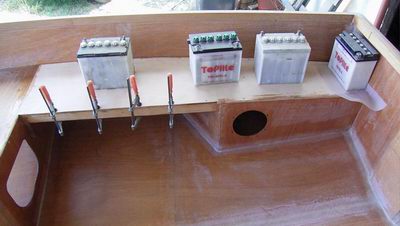
What we are after is not the bikes, but their batteries as they are ideal for our purpose. Their weight depending on size of bike is in the order of 5-8kg (11 - 18lb). The case is plastic, so you can give them a good wash before use and they will clean up nicely. If there is any acid spillage use baking soda to neutralise it and wash again. Unlike motorcar batteries, defunct bike batteries have no real value and the bikeshop will be only too happy if you take them off their hands. |
|||||
| Note the use of wax paper as non-stick separation under the battery near the transom. A mix of methods is used to glue the seat top down. There are clamps, batteries and - not clearly visible - chipboard screws that will be removed once the epoxy has set. | ||||||
| |
||||||
Back to Tips and Hints menu Top of Page
Loading first page footer ... or Your browser does not support JavaScript
Loading second page footer ... or Your browser does not support JavaScript