Loading page header ... or Your browser does not support JavaScript
| |
|
| 6) How to make a scarf joint using a jig and your router A scarf joint is made by tapering the two ends of the materials to be joined at a slope of 1:8 and then gluing them up. This makes a strong joint that does not increase the thickness of the board or lumber. Generally it is used on plywood and lumber that is too short to make up boat panels or stringers and gunwales. There are a number of ways to prepare plywood or any other board or solid timber for the making of a scarf joint. The time honored one is to plane the slope. Circular saws with suitable jigs will do it and of course and not unexpected the router will do this job too. |
|
|
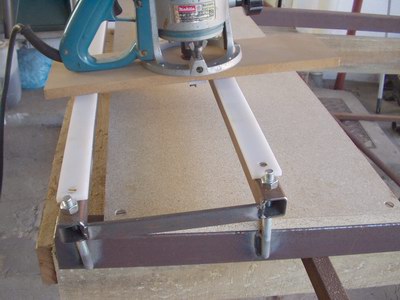
The pictures will convey the idea quite well by themselves, but a few words are in order. I made the jig up using steel hollow sections. Having built a steel yacht, I am very comfortable in this medium and it seemed to me the quickest way to make up a sturdy jig. That is not to say that using lumber is 'out'. The base will support the ply or lumber up to the feather edge. In the picture above you can see the particleboard affixed with machine screws, the left edge is where the featheredge of the scarf will be. |
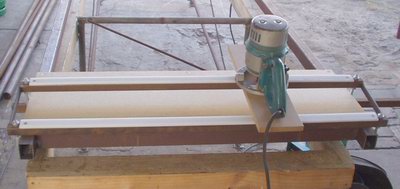
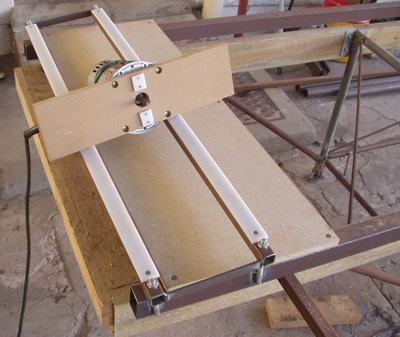
| Two rails with a polyethylene low friction strip attached will guide the router at the chosen angle of 1 : 8. No-one can weld to the accuracy required for the guides to be in perfect alignment to generate the sloped plane across the full width and indeed the same slope at either end. So it is good engineering practice to add adjusting elements. These are made from threaded rod and nuts above and below the guide rail. It is now a simple matter to 'tune' the slope with a little spanner work. A few test runs on scrap plywood will help. This completes the jig itself. The router needs a custom base to straddle the rails and stops to keep the router bit from gouging into the rails. The picture at right shows this quite clearly, whereas the one above shows how the router with the new long base is positioned on the jig. The width of the jig is based on the widest scarf you expect to make, mine is 1 meter / about 39" wide. |
|
|
The actual operation is done with a straight router bit of at least 1/2". Adjust the depth so that the bit just touches the particle board (or MDF) at the lowest point of the slope. To scarf plywood put both sheets on the jig. The bottom sheet's edge right up to the edge of the particle board and the second sheet set back by the width of the scarf. Then you clamp the boards to the base on the far side of the guides. With thin ply of 6mm / 1/4" it will be necessary to use some timber wedges under the guide rail to make sure the sheets lie flat. |
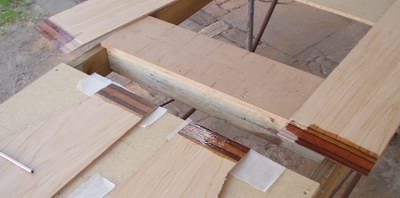
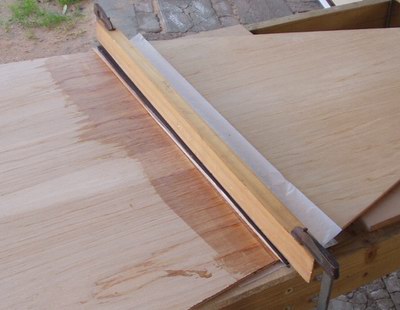
In the picture above you can see two sets of scarfed ply parts. This is 9mm / 3/8" ply and the pattern made by the laminations is clearly visible as epoxy has already been applied.It is always a good idea to prime with neat epoxy before applying the thickened paste. Leave it to soak in well, remember you have a lot more time if you use slow curing epoxy.Note how the gluing base is set up. There are strong supports and a particle board where the gluing pressure will be applied and then a gap so you can inspect from below and scrape excess glue away while it is not yet fully cured. Wax paper has been placed under the ply to prevent gluing the whole lot up. The picture at right shows an assembled scarf joint on a larger piece. Noteworthy is that the pressure is applied by a piece of lumber that has a natural bend in it. This natural downward bend applies pressure to the middle of the scarf. The sequence is: Waxpaper over the joint, then a strip of dense neoprene foam rubber to furhter distribute pressure, then the lumber and two clamps on either end. |
|
| |
|
Loading first page footer ... or Your browser does not support JavaScript
Loading second page footer ... or Your browser does not support JavaScript