Loading page header ... or Your browser does not support JavaScript
| |
|
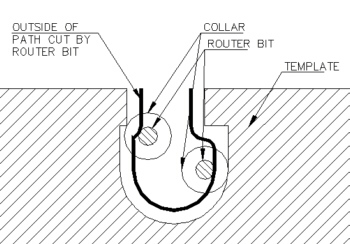
| 2) Templates to cut odd shaped recesses using the template guide. This is a useful trick for repetitive cutting of recesses for hardware etc. that have even fairly complicated outlines. The template guide of my Makita router screws into the base and has an external collar diameter of 5/8" - 16mm. To make a template use 1/4" hardboard, mark out the shape of the finished outline and add half the difference between the router bit's diameter and the guide's (5/8"?) diameter to the outside of the finished line. Cut out and finish by filing etc. then clamp to some scrap and run a trial to check out your template. You will probably find that it does not work first time, but it is easy to correct by overlaying the first try on another piece of hardboard and adjusting where needed. All the locker catches on my boat were cut using such a template. |
|
|
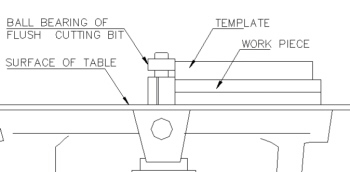
3) Template cutting with a flush cutting bit. The flush cutting router-bit is your basic straight router bit, but with a ball bearing guide at either the bottom end or above the bit, near the shank. The bearing follows the template and the router bit cuts an exact replica. The way it works in practice is that you make up a dimensionally exact part from hardboard, plywood or fiberboard and then screw it with chipboard screws to the rough cut part. Locate screw holes so that they either coincide with holes on the finished article or will be hidden. |
| The template is useful for marking out parts on the plywood - afterwards you cut them out with a jigsaw. This can be quite a coarse cut as long as you do not cut past the line! The router will cut and shape the final part accurately, taking away any excess up to its diameter even. Lower or raise the router bit so the cutting edges match up with the work piece and the ball bearing runs on the template. Hand-held operation is ok on large parts, but for smaller items it is best to mount the router in a table. I have modified my home-built circular saw table to also accommodate the router. It means swopping out tools, but that way I only have one table to find space for. Mounting the router in a table turns it into a spindle moulder and makes work on small parts easy. Using that technique, I have made plywood gaff jaws, boom claws, plywood backing rings for hatches and even some of the part-bulkheads of dinghies. Any symmetrical or duplicated part of complex shape is suitable for this type of operation. |
|
| |
|
Loading first page footer ... or Your browser does not support JavaScript
Loading second page footer ... or Your browser does not support JavaScript