Loading page header ... or Your browser does not support JavaScript
Hints and tips for the use of routers in boat-buildingOf all the power tools the router is in my opinion the most versatile and useful to the boat builder. When I started to build "Tamara", my powertool stable was pretty lean. I had a drill, circular saw and a jig-saw. With joinery imminent, I felt I had to improve on this, so went out and bought a small 3" power planer and a router. At the time I had some misgivings about the router, but I nevertheless did have the sense to buy a large 1/2" collet router. The router seemed somehow the tool that I had overspent on and I assumed it would spend most of its time on the shelf - in fact that place is occupied by the power plane instead.You see, what I did not realise then is that with a little ingenuity you can do just about anything with a router. Some of the more sophisticated uses I eventually put the router to after working my way up through rebates, circle cutting etc., was to cut wind-generator impeller blades on fairly simple jigs. Compared to impellers with their varying pitch angles, routing the wind-steering's auxiliary rudder profile was a much simpler job. Another uncomplicated jig let me cut the course-setting gear for the wind-steering system (from Lexan sheet). A lot of the time the router will of course come in handy for rounding off corners with a TCT bit. This router bit has a ball bearing to guide the bit along one edge and useful sizes are 1/4", 3/8" and 1/2". Now let us look at some useful operations and the custom bases that let us perform them:
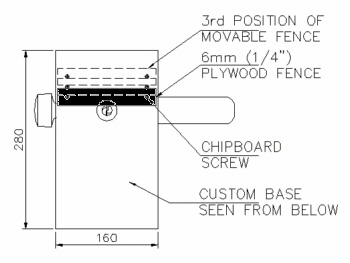
1) Rebates: A custom base will let you cut rebates along the edge of plywood panels to recess the glass/epoxy joint. Most routers come with an adjustable fence for cutting of rebates etc., but this fence is too deep for work on 6mm plywood. The depth of the fence should not exceed the ply thickness so you can work on a table without having to block up the ply or alternatively shift it over to the edge of the table. As it is easy enough to make a custom base with an incremental adjustment for the fence, that is what we will do. To make the base you can use 16mm / 5/8" Melamine faced chipboard or MDF board. Remove the plastic footplate from the router. The footplate is usually attached with machine screws. Copy the layout of holes and countersink or recess the holes for the machine screws. In the middle you will need a large hole for the router bit. I generally make it at least 32mm / 1 1/4". For this application make the custom base longer on the left side of the machine when the handle is in your hand. Refer to the sketch below. A short strip of 6mm / 1/4" plywood forms the stop. Pre-drill two holes and countersink them for the #8x5/8" (16mm) chipboard screws that will be used to attach the plywood to the base. For the recessing of the glass into the outer face of the plywood panel use the largest straight router bit you have. |
|
|
Currently I use a 5/8" 16mm bit with a 1/4" shank - the load on the bit is minimal as it is only cutting a shallow grove. Set the Plywood spacer to just touch the TCT bit when you rotate it by hand. Drill into the base and fit the two screws. Mark the spacer's position with pencil, undo the screws and move the spacer away from the router bit by the diameter of the bit and repeat the operation. Do this as many times as necessary to obtain the width of recess you require. For the first pass fit the stop back to the closest position. Run the router round all panels, then undo the screws of the stop and move it to the next position out and repeat till the recess is of the correct width. Naturally you will check the setting of the cutting depth on a bit of scrap and in any case do a few test runs at the same time before tackling the work pieces. |
| |
|
Loading first page footer ... or Your browser does not support JavaScript
Loading second page footer ... or Your browser does not support JavaScript